Procedures for Specialized Health Care Services
This chapter provides guidance for safely supporting students who require specialized health care procedures during the school day.
Introduction
This chapter is to be used as guidance only and is not a replacement for direct training for each procedure and is based upon standards of practice and best practice. Most importantly, the specific provider authorization/plan should be reviewed by the School Nurse first before implementation. If the school does not employ a School Nurse, the school should follow the provider authorization/plan. If the school employs a School Nurse, the nurse should review the student’s health history, conduct a comprehensive assessment to include student, family, and all educational staff needed to carry out the student’s care needs.
Each local school board should have up-to-date policies and procedures for providing specialized health services to students and should take the following into consideration:
- Parent or guardian to notify the school in writing of the need for such services;
- A signed provider authorization/plan that outlines the type of procedure, time of administration, frequency of administration, and why to administer;
- Require the provider to provide possible adverse reactions or complications and instructions;
- The student’s parent or guardian is responsible for providing all provider orders, medical records, medication, equipment, supplements, oxygen, supplies, and other apparatus necessary for the administration of the specialized health services;
- A statement that the school or school district is usually not required to purchase medical supplies or equipment for an individual student;
- Specialized health services must be authorized annually or when changes occur.
If the school employs a School Nurse, the provider plan and authorization should be reviewed first by the nurse, and then the nurse should write an individualized health care plan, to be reviewed annually.
Recommended Guidelines for Delegation of Specialized Health Services
If the School Nurse is accountable for nursing tasks that are a part of the specialized health services, the school nurse must assess the unlicensed person’s skills and abilities to perform the nursing service. The school nurse must train the unlicensed person to perform the specialized health service, or otherwise see that training is provided to assure that the service is provided properly and safely. Documentation of training must be provided and no unlicensed person should perform that procedure unless the School Nurse delegates and goes through the delegation process for another student.
Complete written instructions, including directions for handling possible complications, must be provided. The School Nurse is to supervise the UAP by initial direction and periodic evaluation of the delegated service. The School Nurse retains accountability for the process of delegation but the UAP is accountable for not following the delegated plan.
For more information on delegation, see Chapter 18 in this manual.
Toileting/Diapering for Students with Specialized Health Services
Toileting/Diapering students may be required due to developmental level or health, or physical or cognitive disabilities of a student; it may require diapering or toileting on a scheduled or on an “as needed” basis. These tasks should be performed with dignity and respect for the student in a private and safe setting.
Due to special education laws and regulations, students cannot be denied entry into or removed from any educational program if they have not mastered this skill. Due to the wide range of disabilities, both physical and cognitive, and the various ages and physical sizes of students who require these services, these procedures should be tailored to each individual student’s specific needs:
- The School Nurse, physical/occupational therapist, teacher, or parent can provide training.
- The student may have special needs requiring specific procedures. This information should be included in the IEP or 504 plan.
- Staff involved in changing diapers or toileting have the potential to spread germs and diseases.
- Follow proper procedures and room set-up to reduce the risk of spreading illnesses.
- All staff involved in toileting and/or diapering must complete the Bloodborne Pathogen Training yearly.
- Parents are usually responsible for supplying diapers, wipes, a change of clothing, and other necessary supplies for their child.
- Schools or districts will supply approved cleaners/wipes for surfaces, gloves, and other protective equipment as needed.
- Consider using a green clean disinfectant or cleaning agent and always EPA approve.
- Staff involved in diapering/toileting should receive the hepatitis B vaccine.
- Staff who prepare or serve food may not change diapers or assist in toilet training.
- Staff should be trained to check each student’s diaper at least once every two hours and change the diaper promptly if it is wet or soiled.
- If the student is sleeping, the diaper must be checked when the student awakes.
- Talk to the student about what you are doing.
- Bring the student to the changing area and wear appropriate Personal Protective Equipment (PPE) – gloves, sleeves, and apron if necessary.
- Prepare the changing area by wiping with a sanitized/disinfectant wipe and/or placing protective paper on the changing surface.
- Transfer student to changing surface and never leave alone on changing surface.
The policy and procedures must be posted in the diaper changing area. It is strongly recommended that two adults always be present when performing these tasks. Also, that the diapering/bathrooming is performed by an adult of the same gender of the child.
Diapering Procedure
A student’s diaper should be changed when wet or soiled and checked prior to bussing/end-of-day pick up. All necessary equipment and supplies should be easily inventoried to ensure availability for each day. Keep accessible all supplies in changing area. Ensure the diapering plan is discussed and agreed upon with the parent prior to diapering the first time. The following steps should take place when assisting a student with toileting:
- Talk to the student about what you are doing.
- Bring the student to the changing area and wear appropriate Personal Protective Equipment (PPE) – gloves, sleeves, and apron if necessary.
- Prepare the changing area by wiping with a sanitized/disinfectant wipe and/or placing protective paper on the changing surface.
- Transfer student to changing surface and never leave alone on changing surface.
- Remove soiled diaper and place in a covered waste receptacle.
- Clean student using wipes or soap and water.
- Dispose of soiled gloves and put on a clean pair of gloves.
- Make sure the student’s clothing is clean and dry. If not, change the student’s clothing and send home soiled clothing in a plastic bag.
- Place the clean diaper on the student.
- Transfer the student from the changing area.
- Remove the changing paper and clean the surface with district-approved cleaner or wipes.
- Use approved hand-washing techniques to clean your hands.
- The soiled/wet diaper container should be cleaned and sanitized daily.
- Cleaning supplies should be kept out of reach of students.
Toileting Procedure
Access to an appropriate toileting environment for each student should be made. It is important for students with special health services needs to consider if an escort to the toileting area is necessary. Ensure the toileting plan is discussed and agreed upon with the parent prior to toileting assistance. If a staff member is required to assist with toileting, two-adult supervision is necessary. The following steps should take place when assisting a student with toileting:
- Escort the student to bathroom.
- Talk to the student about what you are doing.
- Put on PPE – gloves, and protective sleeves or apron if necessary.
- Prepare the toilet by wiping it with a sanitized/disinfectant wipe and/or placing protective paper.
- Assist the student with clothing.
- Transfer and/or assist the student to the toilet.
- If required, stabilize the student on the toilet seat.
- Clean the student when finished.
- Make sure the student’s clothing is clean and dry. If not, change the student’s clothing and send home soiled clothing in a plastic bag.
- Remove the gloves and dispose of the soiled gloves following Universal Precautions procedures.
- Transfer the student from the toilet.
- Supervise children in how to correctly wash their hands after using the bathroom.
- Clean your hands using approved hand-washing techniques.
Blood Glucose Monitoring
Students may have a need to have blood glucose monitored to determine stability of blood sugar level, need for therapeutic intervention such as administration of insulin or food. It is recommended that equipment be provided by the student’s parent/guardian and kept at the school for use.
If this procedure is performed by the student, School Nurse, or other qualified school personnel procedure the following is recommended:
- Wash hands thoroughly with soap and water.
- Assemble equipment on clean work surface in appropriate location.
- Wash student’s hands thoroughly with soap and water.
- Follow manufacturer’s instructions for use of the glucose monitoring kit.
- Dry student’s finger with gauze and discard used stylet into appropriate container. Dispose of gauze, gloves, and any other contaminated material in plastic-lined waste receptacle. Clean work area and wash hands.
- Record glucose level and procedure on student log and sign.
- Proceed with follow-up as specified in the student’s Individualized Health Care Plan. This may include parent notification and administration of food or insulin.
Cardiopulmonary Resuscitation (CPR)
For more information, see Chapter 8.
Cardiopulmonary resuscitation goal is to restore spontaneous circulation using the techniques of chest wall compression and pulmonary ventilation to provide an adequate supply of oxygen to the brain until medical help arrives. This procedure must be performed by school personnel that have been trained in CPR. It is recommended that ALL school personnel working with severely health-impaired or handicapped students receive training and certification in emergency airway management and cardiopulmonary resuscitation procedures. Possible indications for need:
- Airway obstruction.
- Impending airway obstruction and respiratory crisis.
- Cardiopulmonary arrest.
- Anaphylactic reaction.
- Respiratory paralysis.
- Acute head or cervical spinal cord injury.
- Drug overdose.
- Over-oxygenation or other conditions which result in the cessation of normal breathing and/or heart contractions.
Central Venous Line (CVL)
A central venous line (CVL) is a long-term catheter that is surgically inserted into a deep, large vein in the neck or the chest, usually near the heart. Students usually have these lines placed when there is a need for long-term delivery of intravenous food and/or medication. CVLs are used to provide fluids, proteins, carbohydrates, vitamins, or minerals to a student who is unable to get adequate nutrients for growth and development through oral or gastric tube feeding.
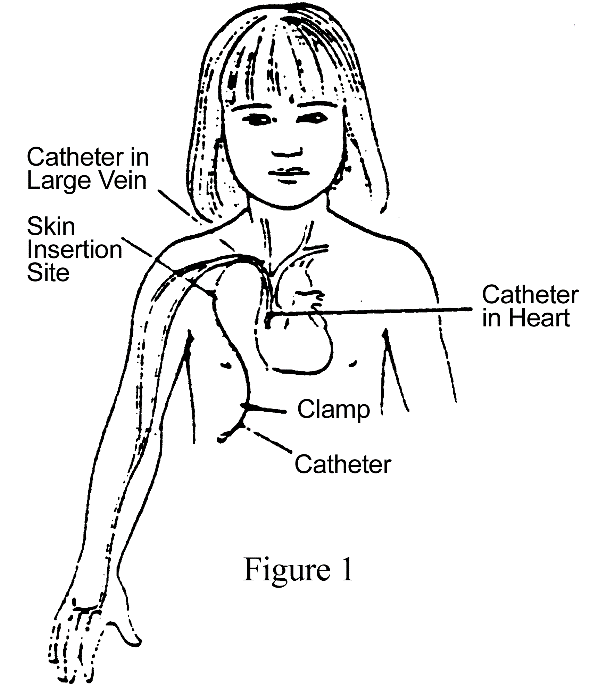
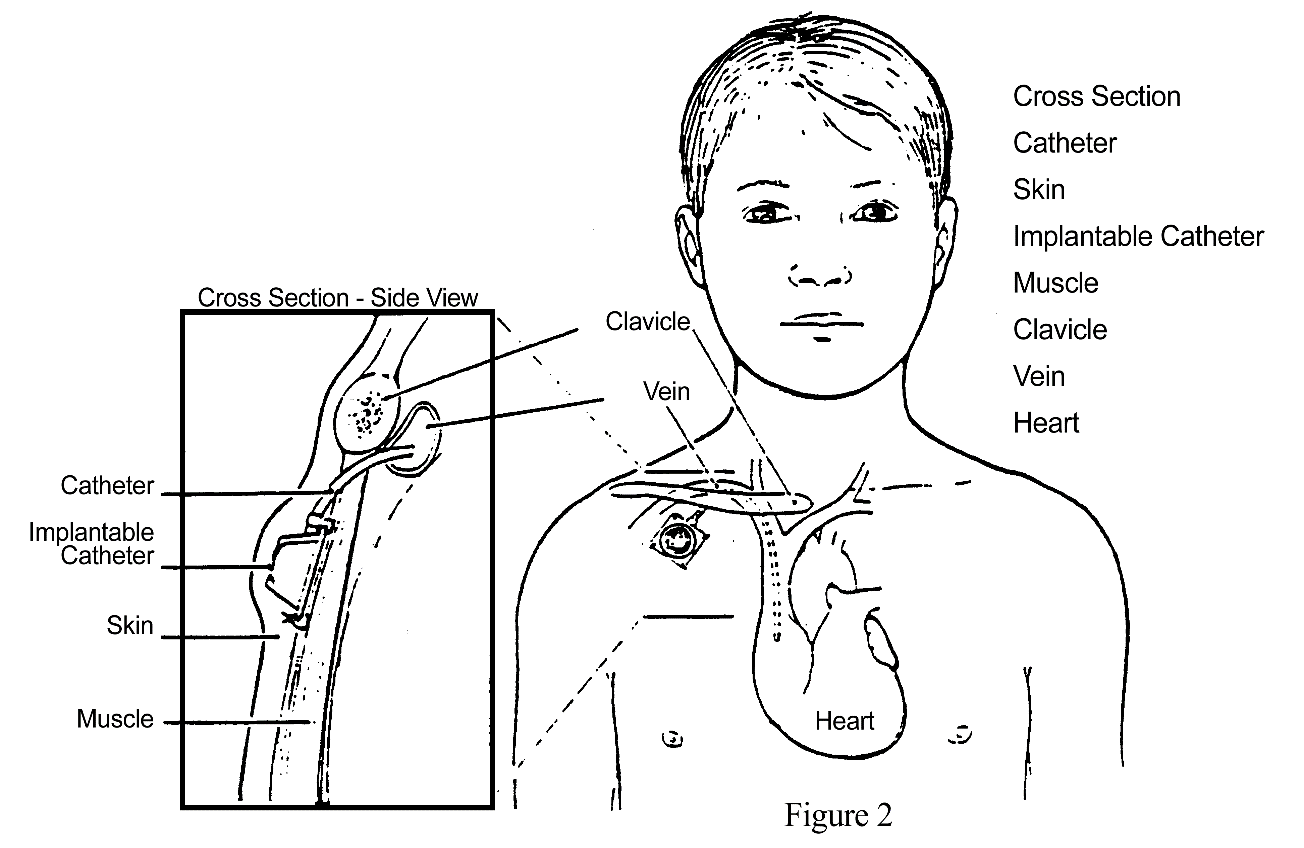
Indications
CVLs are indicated for students with health conditions or abnormalities of the intestinal tract that interfere with adequate consumption of calories or absorption of nutrients ingested orally; for students who have recurrent aspiration of stomach contents into the lungs causing frequent pneumonia; or who have acute trauma precluding utilization of other methods of satisfying nutritional needs. It may be used when there is a need to "rest" the bowel, when the intestines are unable to absorb adequate nutrients, or when students are receiving chemotherapy.
Procedure Principles for Dressing Change of CVL
Dressing changes should routinely be done at home. If a dressing change must be done at school, it should be performed by a school nurse with documented competency-based training in appropriate techniques and problem management. As with all medical conditions, every effort should be made to protect the student's privacy. For a student with a CVL, the following items should receive particular attention:
- The School Nurse should be aware of the student's underlying condition and potential problems associated with the condition or treatment.
- An additional dressing kit including a spare clamp and sterile gloves should be provided by the parent.
- Any fever needs to be investigated.
- Universal precautions should be followed when handling the line.
- No one should touch the tubing or the dressing unless a complication occurs.
| Procedure | Points to Remember |
| 1. Wash hands. | Dressing change should be carried out in the private area of the health office. |
2. Assemble equipment:Catheter dressing kit or equivalent contains:
Also needed:
|
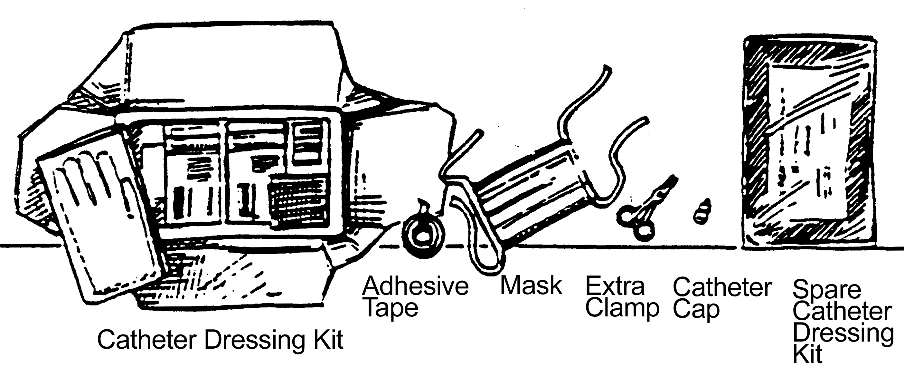
Different dressing kits may be used that do not contain all of these components. Those items not included in the kit should be supplied separately. |
| 3. Explain the procedure to the student according to his/her level of understanding. | |
| 4. Put on a mask. | |
| 5. Open the catheter dressing kit on a clean work surface. | Although not all CVC dressing changes are done using sterile procedures, students receiving TPN do have sterile dressing changes. |
| 6. Assist student in removing clothing to uncover dressing. | The student may be sitting or lying flat. |
| 7. Position the student. | |
| 8. Remove wet or soiled dressing from the catheter exit site. | Discard in the appropriately-marked biomedical waste container. |
| 9. Inspect the skin around the catheter for redness, swelling, or fluid drainage. | This may be a sign of infection. If you notice any of these symptoms, notify the physician and parents. |
| 10. Put on sterile gloves. | |
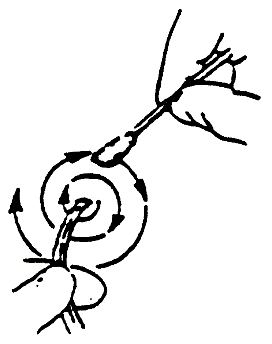
| 11. With an alcohol swabstick, clean the skin. Start at the center next to the catheter and work outward in widening circles. Repeat the cleaning process two more times. | Start at the exit site.
Be sure to clean approximately two inches of the catheter itself, starting at the exit site. Allow the alcohol solution to dry about 30 seconds.
|
| 12. Repeat the same procedure using povidone iodine swabsticks.
Allow the povidone iodine to dry about 30 seconds before proceeding. |
Iodophor solutions require at least 30 seconds to maximize antibacterial and antifungal action. |
| 13. Gently pat the skin dry with sterile gauze. | |
| 14. Apply a small dab of povidone-iodine ointment to the catheter exit site. | |
| 15. Lay the gauze over the ointment on the catheter exit site. | |
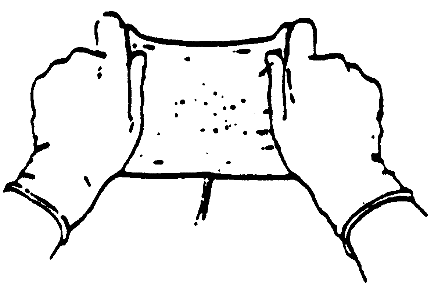
| 16. Using a layer of transparent dressing, cover the gauze and secure the dressing to the skin. | Some students may have a non-adhering type of dressing placed or a split sponge.
|
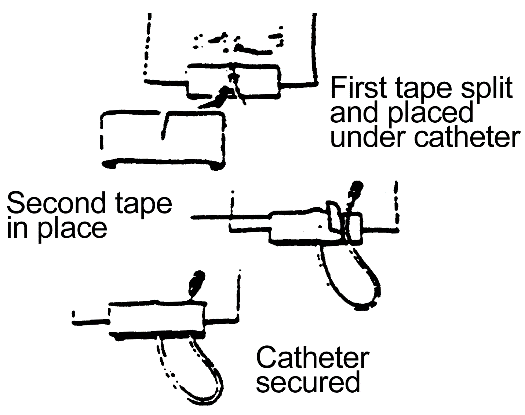
17. Using tape, secure catheter at a second point to reduce strain on the catheter.
|
This may be done in a different manner than illustrated.
|
Possible Problems
Equipment for emergencies
|
|
|
| Observations | Reason/Action | ||
| Blood in tubing or bleeding from the end of the tubing. | Whenever bleeding is seen, gloves should be worn. Most students will have their CVCs capped while in school. If blood is noted in the line or coming from the end of the line, check to see if the clamp is open. If so, close clamp. Transfer the student to the health office. The catheter may need to be flushed with saline and instilled with heparin as specified in the Health Care Plan. Notify parents.
If the clamp has broken or is not functioning properly, the tubing should be firmly clamped, and the physician and parent contacted immediately. Activate the emergency plan. |
||
| The student develops a fever, redness at the CVC site, drainage, increased fatigue, irritability, or headache. | The parents and/or physician should be called at once. These are indications of infection. | ||
| The CVC is pulled or falls out. | STAY CALM. REASSURE STUDENT. Whoever is at the site first should cover the CVC exit site.
Inspect the exterior of the dressing. If the dressing is intact and the tape still holds the looped catheter, probably no significant trauma to the student or the line has occurred. The parent and physician should be notified anyway. If the tape or dressing has been disrupted, they should be taken off and the exit site inspected by the School Nurse. If the catheter has fallen out, apply firm pressure to exit site (bleeding should be minimal). Notify the physician and parent immediately. Activate the emergency plan. |
||
| The catheter tubing is broken. | Clamp the catheter above the break. Notify the School Nurse, who will wrap the broken end with sterile gauze.
Notify the parent and physician immediately. Be prepared to initiate emergency plan. The catheter can usually be repaired by the physician at the hospital. |
||
| The student is complaining of chest pain or difficulty in breathing. | Have him/her lie on the left side to prevent an air bubble from entering the heart.
Once the tubing is securely clamped and not leaking, notify the School Nurse. DO NOT LET THE STUDENT WALK. *THE STUDENT SHOULD BE TRANSFERRED AS SOON AS POSSIBLE TO THE APPROPRIATE HOSPITAL EMERGENCY ROOM. IF THE SCHOOL NURSE IS NOT AVAILABLE, PINCH TUBING WITH CLAMP OR FINGERS AND CALL EMTs/AMBULANCE. NOTIFY THE PARENT(S) AND PHYSICIAN IMMEDIATELY.* |
||
Foreign-Body Airway Obstruction
For more information, see Chapter 8: New Mexico Emergency Guidelines for Schools.
When a student is presenting with a foreign body airway obstruction it is due to a blocked airway. The goal is to restore adequate air exchange and breathing to prevent respiratory arrest, anoxia, or cardiac arrest.
Foreign body airway obstruction is due to choking with the trachea blocked due to food or other foreign object, so that little or no air is passing in or out of the lungs. The student will be unable to talk or cough effectively, may make a crowing noise during exhalation, and they will show extreme respiratory distress and possible cyanosis.
This procedure is to be performed by qualified school personnel who have been trained in this procedure by the School Nurse or other certified person or agency. It is STRONGLY recommended that all school personnel working with severely handicapped students be trained in this procedure.
Determine need for the procedure by assessing whether there is partial or complete obstruction of the airway. If the student is receiving enough air to allow forceful coughing or speech, do not interfere with the student’s efforts to expel the food or foreign object.
Lifting Techniques for Moving Students
Lifting techniques to pick up, move, raise, support, or transport a student from one place to the other by manual means may be required, if the student is unable to move or transfer independently. Equipment necessary for appropriate and safe will be individualized for each student. It is recommended that the School Nurse, physical therapist, occupational therapist, and adaptive physical education teacher work together to provide school personnel with training needed to lift or transfer students safely. An annual in-service training is suggested for all school personnel at each school site.
There are best practice or principles of lifting and transport for moving students.
Carefully evaluate the size and physical condition of the student before attempting a lifting procedure. It may be necessary for two people to complete the lift. If in doubt, get help.
- Use gravity when possible by sliding student on a hard surface.
- Use smooth, steady motions.
- Keep head and trunk in good alignment and move as one unit. Do not lift or exert force with trunk in a twisted or awkward position.
- Roll turn or pivot student when possible, instead of lifting.
- Use legs to do most of the work, NOT THE BACK! Legs must be in a flexed position to supply the force necessary for lifting.
- Synchronize movements so that the load is distributed over many muscles. Be sure of your footing. Avoid student load shifts.
- To lift student from floor, squat, bending knees, and pull student close to lower abdominal area. Then lift by straightening legs, keeping back straight. To put student on floor, reverse procedure.
- If it is necessary to carry student, keep the student as close to the lower abdominal area as possible. Try to keep student’s arms and legs close to their body so that you will not be pulled off balance.
- Never lift student more than chest high.
- All students should be encouraged to use their muscles as much as possible to help in the procedure, even it takes more time.
- Always use mechanical devices such as wheelchairs, hydraulic lift, handrails, or trapeze to move student if possible.
- Before transferring a student to a diapering table or chair be sure object or equipment is in an accessible, secure position and wheelchair brakes are locked.
- A general recommendation is one person lifting for each 30 to 50 pounds of student weight. (Check local school district policy regarding weight limits.)
- Use proper lifting techniques.
- Wear comfortable shoes with good support.
- Bend with knees and keep back straight. Do not turn or twist to pick up something, and never bend straight over.
- Practice good posture and body mechanics.
- Good exercise program will help build strong and flexible supporting muscles, especially the abdominal muscles. Check with the physical therapist, adaptive physical education instructor or your physician regarding an appropriate exercise program.
- Help relieve unnecessary back strain by keeping weight within the normal range for height and body build.
- See a physician as soon as possible for any persistent back pain.
Nebulizers and Inhalers
Nebulizer and inhalers deliver a fine mist through the mouth/nose to the lungs to improve or prevent impaired breathing and the purpose or goal is to thin secretions which impair breathing by restoring humidity or delivering medication to the airway and improve respiratory function through the administration of humidified bronchodilators, mucolytics, or corticosteroids.
There are many reasons that nebulizers or inhalers would be used to deliver medication, including: chronic lung disease such as bronchopulmonary dysplasia, asthma treatment, or prevention of respiratory distress.
The school will need the following:
- Physician’s order (required annually), including flow rate, method of administration, and specific indications for administration.
- Aerosol facemask or mouthpiece.
- Tubing.
- Nebulizer with chamber for sterile saline and medication.
- Prescribed medication for nebulizer.
- Peak flow meter (if indicated), aero chamber or inspir-ese or metered dose inhaler.
This procedure is to be performed by the School Nurse, the parent, or the student. Medication must be administered according to the medication policy of the local school or school district and should include:
- Refer to the physician’s order for conditions and time of administration.
- If the treatments are to be administered on an as-needed (PRN) basis, ascertain that student has symptoms as described in physician’s order.
- Wash hands.
- Place student in an upright position for maximum chest expansion.
- Fill the nebulizer with sterile saline and/or prescribed medication.
- Attach tubing mask or mouthpiece.
- Place the mask over student’s mouth and nose and tighten strap until held securely in place. If mouthpiece is used, instruct student to hold nebulizer upright, close lips around mouthpiece, and inhale deeply. Hold for several seconds before exhaling. Continue treatment according to physician’s orders.
- Remove equipment, rinse chamber, mask or mouthpiece with warm soapy water, rinse, and air-dry.
- Once a week, the tubing, mask, mouthpiece, and chamber should be washed with vinegar water, rinsed, and air-dried.
- Record procedure on student’s log, date, and sign.
To use a metered-dose inhaler do the following:
- Shake medication container.
- Remove cap from mouthpiece.
- Attach aero chamber or inspir-ese, if ordered.
- Invert inhaler and place mouthpiece near mouth.
- Instruct student to exhale, pushing air from lungs, then hold mouthpiece 2 inches from lips; press mouthpiece and bottle together while inhaling; release and hold breath for 3–5 seconds before exhaling.
- Repeat treatment sequence according to physician’s order. If using an aero chamber or inspir-ese, follow manufacturer’s instructions.
- If using inhaled steroids, have the student rinse mouth with water to prevent thrush.
- Rinse mouthpieces replace cap and return to storage area.
- Record procedure on student’s log, date, and sign.
Ostomy/Stomal Care
An ostomy is a surgically-made opening into the abdominal wall. This may include colostomy (large intestine), ileostomy (small intestine), or ileal conduits (ureters). Its purpose is to provide comfort and security, to protect the skin, to control odor, and to control leakage. For colostomy, ileostomy, or ileal conduits the following will be needed:
- Extra pouch/bag.
- Double faced adhesive and adhesive remover.
- Skin barrier.
- Hypoallergenic tape.
- Gloves (provided for staff by local school district).
All stomal care procedures are to be performed by the student, School Nurse, or other designated qualified school personnel who have been trained by the nurse to perform these procedures under indirect supervision of the nurse.
There are procedural principles to be followed:
- Assemble equipment and accompany student to bathroom or other appropriate private area.
- Position student with stomal area exposed.
- Place absorbent material around stoma to absorb drainage.
- Remove ostomy pouch/bag (note color and odor of drainage) and empty into toilet. Never empty into sink.
- Clean skin gently with wet wipes or washcloth with soap and water, and dry thoroughly.
- Apply skin barrier according to skin condition and type of pouch. Failure to cover all skin surrounding stoma will cause leakage and skin breakdown. Skin barrier should be at least as large as opening of pouch.
- Place clean pouch securely over skin barrier, covering stoma. Apply more adhesive if necessary and trim pouch to fit if necessary (opening should be 1/8 inch larger than stoma).
- Secure pouch according to directions with tape, clip, bands, or belt.
- Discard old pouch if disposable. Save reusable pouch and rinse out with water over toilet. Place in plastic bag and send home with student.
- Clean work area and wash hands.
- Record procedure on student’s log, including date and time, color and odor of drainage, and name of person performing procedure.
Colostomy Maintenance
| Observations | Reason/Action |
| Odor. | A properly cared-for colostomy should not have a persistent odor. If there is an odor, check for a leak in the bag or for a poor seal. |
| Leakage. | Check to see if bag is too full, or if it has a leak. Other causes include inadequate or improper stoma care, improper bag size for stoma, or a change in stool pattern (diarrhea). |
| Bleeding from stoma. | The stoma is very easily irritated. This may happen if it is rubbed too hard during cleaning, or nicked with a fingernail. Usually, the bleeding stops quickly. If it doesn’t, apply gentle pressure and notify the parent. If a large area of the stoma appears to be bleeding, notify the parent or the doctor. |
| Irritation/Skin breakdown around stoma. | Usually this is due to improper stoma care, such as poor seal of the bag or inadequate barrier on the skin. If the skin is just red, make sure that skin barrier is properly applied. Also, check that the student is not using any new barrier or adhesive preparation (possible allergic reaction). |
| Skin is raw or weeping. | Contact the parent or doctor. |
| A rash with small red spots. | There may be a yeast infection. Clean and dry the skin carefully and notify the parent. |
| Change in stool pattern. | If the student is having either looser stools than before, or much fewer, notify the parent. This may be due to diet changes or illness. |
Ileostomy Maintenance
| Observations | Reason/Action | |
| Odor. | A properly cared-for ileostomy should not have a persistent odor. If there is an odor, check for an improperly cleaned bag or belt, or a leak around the stoma or in the bag itself. | |
| Leakage. | Check to see if bag is too full or has a leak. Other causes include inadequate or improper care, wrong bag size for stoma or change in amount of fecal drainage. | |
| Bleeding from stoma. | The stoma is very easily irritated. This may happen if it is rubbed too hard during cleaning, or nicked with a fingernail. Usually the bleeding stops quickly. If it doesn’t, apply gentle pressure and notify the parent. If a large area of the stoma appears to be bleeding, notify the parent or the doctor. | |
| Irritation/Skin breakdown around stoma. | Usually this is due to improper stoma care or to an inadequate barrier on the skin. Fecal discharge from ileostomies is very irritating to the skin due to the presence of digestive juices in the fluid. Therefore, it is very important to have a proper seal and skin barrier. Also, check that the student is not using any new preparation that might be causing an allergic reaction. | |
| Skin is raw or weeping. | Contact the parent or doctor. | |
| Rash with small red dots. | This may be a yeast infection. Clean and dry the skin carefully and notify the parent. | |
| Change in stool pattern. | If the student either has more watery stools than usual or has not had any discharge from the ileostomy, notify the parent. This may be due to diet changes or illness. | |
Urostomy Maintenance
| Observations | Reason/Action |
| Odor. | Fresh urine should not have a strong odor. If there is an odor, check for an improperly cleaned bag or belt, or a leak around the stoma or in the bag itself. URINARY TRACT INFECTIONS MAY CAUSE THE URINE TO HAVE A STRONG SMELL. |
| Leakage. | Check to see if the bag is too full or has a leak. Other causes include inadequate or improper stoma care (such as inadequate adhesive), or incorrect bag size for the stoma. |
| Bleeding from stoma. | The stoma is very easily irritated. This may happen if it is rubbed too hard during cleaning or nicked with a fingernail. Usually, the bleeding stops quickly. If it doesn’t, apply gentle pressure and notify the parent. If a large area of the stoma appears to be bleeding, notify the parent or the doctor. |
| Irritation/Skin breakdown around stoma. | Usually this is due to improper stoma care, or to inadequate barrier on the skin. Also, check that the student is not using any new preparation that might be causing an allergic reaction. |
| Skin is raw or weeping. | Contact the parent or the doctor. |
| A rash with small red dots. | This may be a yeast infection. Clean and dry the skin carefully and notify the parent. |
| Decrease or change in the flow of urine. | This may occur if the ureterostomy has narrowed. Notify the parent of any change in urine flow. |
Oxygen Administration
Oxygen may be administered by mask or nasal cannula to prevent hypoxia and symptoms of inadequate oxygenation, either local or generalized. The reasons may be hypoxia resulting from seizures, cardiac problems, chronic lung disease, or other conditions.
Necessary equipment will be:
- Oxygen tank or portable oxygen unit equipped with flow meter and pressure gauge that measures level of oxygen remaining in tank.
- Tubing, mask, or nasal cannula.
- Any other equipment provided and recommended by manufacturer/vendor.
- Physician’s order and parent authorization (required annually).
This procedure is to be performed by the student, the School Nurse, or other school personnel, who have been designated and trained by the nurse to perform this procedure with indirect supervision of the nurse. Students on continuous oxygen will require monitoring to assure that their equipment functions properly during the school day. Tubing needs to be cleaned or changed frequently. Arrangements must be made by parents for routine maintenance of the oxygen tank and equipment. Keep oxygen tank secured in an upright position away from heat and in reasonable proximity to the student. Oxygen supports combustion so there is always danger of fire when oxygen is being used. It is mandatory that there is no smoking or flames, and the area should be kept clear of highly combustible materials. In case of a fire in the building or classroom, evacuate the building immediately. Notify the Fire and Rescue personnel of the location of the oxygen tank.
Additional guidelines for safe storage and administration of oxygen administration:
- Turn main valve of oxygen tank on and adjust liter flow according to manufacturer’s directions on tank and physician’s orders.
- Place mask or cannula on student’s face/nose and continue treatment according to physician’s order or until symptoms disappear.
- Turn tank off according to manufacturer’s directions.
- Record procedure on student’s log and sign. Note date and length of administration and any other significant information.
- If a student is on continuous oxygen, monitor the student to assure that oxygen is being delivered according to the physician’s orders, the level of oxygen in the tank is sufficient, the equipment is functioning properly, and safety precautions are being observed. Students may use a standard or portable tank as appropriate or a combination of these during the school day.
- The School Nurse or the parent/guardian should provide appropriate information and training to bus drivers to assure safe transportation of students requiring oxygen.
Oxygen Use Maintenance
| Observations | Reason/Action |
The student shows any of the following signs of respiratory distress:
|
Stay calm.
Reassure student. Check student:
Check equipment:
|
| The student remains in respiratory distress despite receiving adequate oxygen flow, has a respiratory arrest or becomes unconscious. | Initiate emergency procedure and notify parents. Begin CPR if needed. |
Other Potential Problems
| Redness, dryness, or bleeding of the skin. | May be due to irritation from the device or from insufficient humidity.
Notify parent to discuss problem with doctor. NEVER USE POWDERS ON THE FACE. |
NOTE: See Chapter 8 for Guidelines for Oxygen Maintenance/Storage.
Peak Flow Meter Use
DEFINITION: Peak Flow Meter measures peak expiratory flow (PEF), a valuable indicator of lung function.
PURPOSE: Correct use of this instrument will help the medical provider follow the student’s condition closely to provide the most beneficial treatment.
EQUIPMENT: Peak flow meter.
| Cleaning the Meter
It is not necessary to clean the instrument after each use. Once each week should be enough. Cleaning is simple.
Checking the Meter The meter must be checked periodically to see if it is functioning properly. Since ASSESS is made of clear plastic, it is easy to see if it is operating correctly. A damaged meter should not be used. Procedure Principles Follow these step-by-step instructions.
|
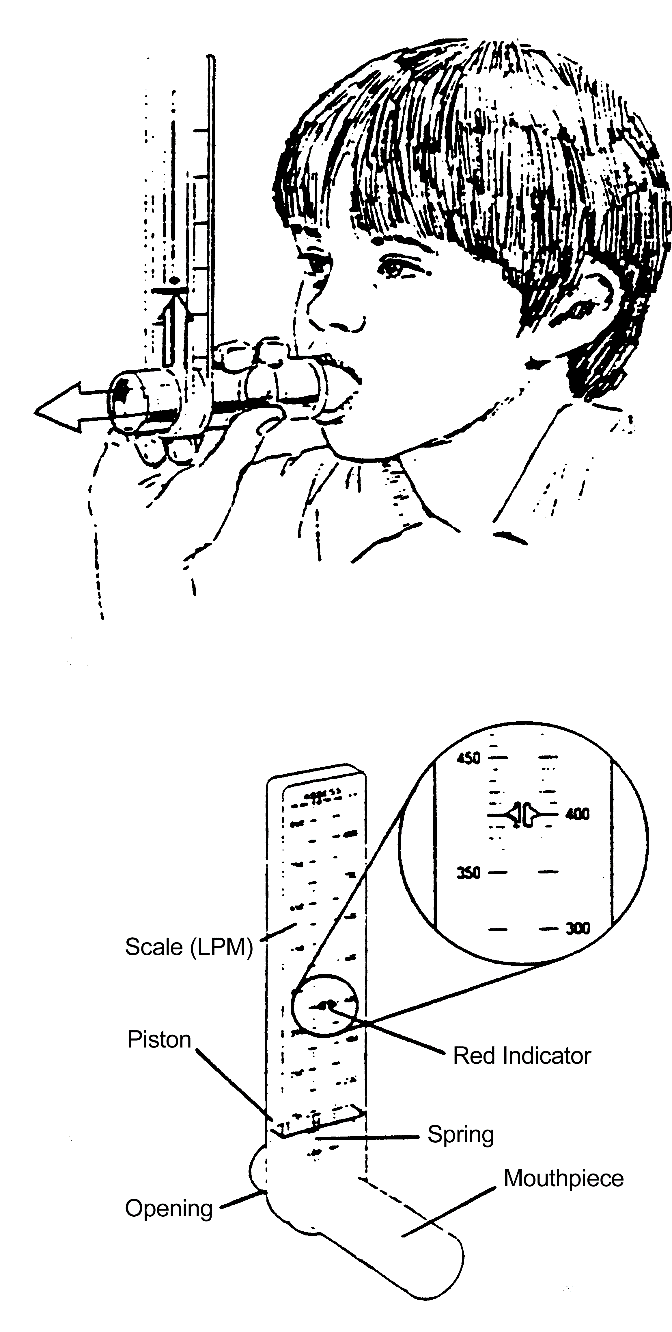 |
- Inhale as deeply as possible and place your mouth firmly around the mouthpiece, making sure your lips form a tight seal.
- Blow out as hard and fast as you can. This will cause the red indicator to move up the scale. The final position of the red indicator is your peak flow.
- Take three readings and record the highest value along with the date and time in the Daily Record Chart provided with the peak flow meter. (The student’s doctor will show him/her how to record the readings correctly.)
- To repeat the test, slide the red indicator back to the bottom of the scale.
NORMAL PREDICTED AVERAGE PEAK EXPIRATORY FLOW
| ASTHMA PEAK FLOW MONITORING | |||||||||||||||||||||||||||||||||||||||||||||||||||||||||||||||||||||||||||||||||||||||||||||||||||||||||||||||||||||||||||
 |
RED | STOP! Patient should get medical treatment immediately. Give 4 puffs of albuterol and take to ER or MD immediately. Less than 50% of patient’s personal best. | |
||||||||||||||||||||||||||||||||||||||||||||||||||||||||||||||||||||||||||||||||||||||||||||||||||||||||||||||||||||||||
| YELLOW | CAUTION! Patient may require additional medications. 50–80% of patient’s personal best. | ||||||||||||||||||||||||||||||||||||||||||||||||||||||||||||||||||||||||||||||||||||||||||||||||||||||||||||||||||||||||||
| GREEN | Asthma under control. Go ahead with patient’s regular activities. 80–100% of the patient’s personal best. | ||||||||||||||||||||||||||||||||||||||||||||||||||||||||||||||||||||||||||||||||||||||||||||||||||||||||||||||||||||||||||
|
|||||||||||||||||||||||||||||||||||||||||||||||||||||||||||||||||||||||||||||||||||||||||||||||||||||||||||||||||||||||||||
Peak Flow Readings
- Make sure that records are kept up to date.
- The medical provider can provide a management plan based on peak flow measurements. Contact the provider when changes in readings occur that may indicate worsening of a student’s condition as per the provider’s instructions.
- Taking daily peak flow readings will help the provider make important decisions about asthma treatment.
Postural Drainage
Postural drainage provides relief of lung congestion by placing the student in one or more postural drainage positions to enable secretions to drain from lungs by gravity. For greater effectiveness, this procedure may be combined with percussion. The reason for postural drainage is to enable lung secretions to drain by gravity into the major bronchi or trachea so they can be dislodged by coughing, percussion, vibration, or suction. Indications for students will be with respiratory problems involving thick or excessive lung secretions, ineffective cough, or weak respiratory muscles. EquiPillows, beanbag chair, tumble forms, or similar equipment.
- Tissue.
- Gloves (provided for staff by local school district).
- Paper bag.
- Physician’s order and parent authorization (required annually).
This procedure is to be performed by the School Nurse, occupational therapist, physical therapist, or other school personnel who have been trained by the nurse, OT, or PT to perform this procedure under indirect supervision using the following:
- Assemble equipment in suitable area, explain procedure to student and wash hands.
- Omit STEPS 2 THROUGH 4 UNLESS PERCUSSION HAS BEEN ORDERED.
- Position student seated in front of and with back towards provider, leaning student back about 30 degrees. percuss the shoulder area using two fingers or cupped hands to deliver short, firm blows for approximately 3 to 5 minutes.
- Lean student forward over small pillow and percuss upper back on each side. Percussion is never done over the spine, sternum or below the rib cage.
- Position student on their back on a large pillow and percuss the area between the collarbone and the nipple on both sides of chest.
- Position the student on right side in beanbag chair with head lowered about 15 degrees.
- Leave in this position approximately 5 to 10 minutes or as ordered. If percussion is used, percuss the area over the left nipple and under arm.
- Repeat step 5, placing student on left side.
- Position student on back in beanbag chair with head lowered about 30 degrees. Leave student in this position approximately 5 to 10 minutes or as ordered. If percussion is used, percuss over the lower ribs on both sides of the chest.
- Repeat step 7, placing student on abdomen.
- Clear secretions from student’s mouth with tissue. Proceed with suction if ordered.
- Discard used tissue in paper bag.
- Clean area and wash hands.
- Record procedure on student’s log, date and sign.
Suctioning
Suctioning is a method for removing excessive secretions from the airway through the mouth (oral), nose (nasopharyngeal), or tracheal passages to provide an open airway by keeping it clear of excessive mucous and excretions.
The reason is to help students who are unable to clear their airway sufficiently and exhibit respiratory difficulty because of an airway blocked with secretions and the following will be needed:
- Suction machine.
- Suction catheter with vent.
- Connecting tube.
- Collection jar.
- Large jar or container of water.
- Tissues.
- Disposable gloves (provided for staff by local school district).
- Physician’s order and parent authorization (required annually).
This procedure is to be performed by the School Nurse or other school personnel who have been designated and trained by the nurse to perform this procedure with indirect supervision of the nurse:
- Assemble equipment, wash hands, and explain procedure to student.
- Turn on suction machine and regulate pressure.
- Attach catheter to suction tubing and place tip in container of water to draw water through catheter to lubricate and check suctioning capability.
- Insert catheter into area to be suctioned. Place thumb over catheter vent and slowly withdraw catheter while rotating it between thumb and finger. If catheter “grabs” remove thumb to decrease suction.
- Dip catheter tip into container of water to clean.
- Repeat process as necessary, suctioning no longer than 10 seconds at a time. Prolonged suctioning may produce laryngo-spasm, slow heartbeat, and/or arrhythmia from vagus nerve stimulation and loss of oxygen.
- Turn off suction machine when suctioning is complete. Respirations should be quiet and occur with less effort.
- Discard secretions and unused water into toilet. Clean equipment, discarding solution in toilet.
- Clean work area. Wash hands and never discard secretions into sink.
- Record procedure on student’s log. Record any significant findings, such as amount, color, and consistency of secretions. Sign and date.
Tracheostomy Care
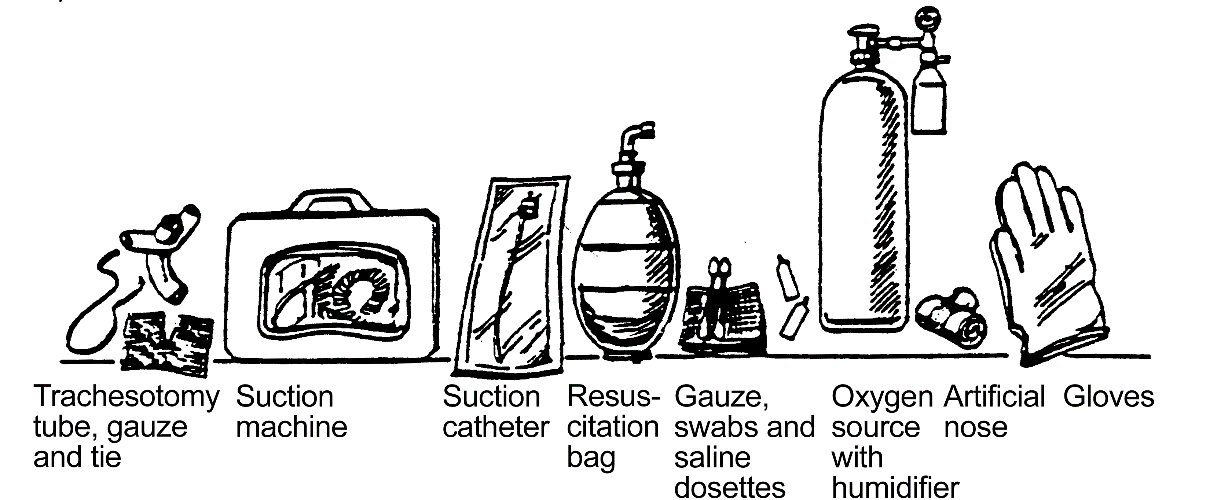
A tracheostomy is a surgically made opening in the neck (trachea) to allow for breathing when the normal pathways are impaired. The opening is held open by means of a metal or plastic tube that is tied in place. The equipment needed:
|
This equipment must accompany the student at all times, including transport and classroom activities. A backpack or other carrying device may serve as a travel bag. This equipment should be checked daily.
It is encouraged that a manual resuscitator bag be obtained with adaptor if the student does not have one at home. |
Possible Problems Require Immediate Attention
*DO NOT LEAVE STUDENT ALONE*
The student shows any of the following signs of respiratory distress:
| Observations | Reason/Action | ||
| Coughing. | This may be due to a plugged trach tube from mucus or foreign matter. | ||
| Color changes. | Reassure student. | ||
| Wheezing. | If trach tube is blocked (suction catheter will not pass), change inner cannula if present, or replace entire trach tube. | ||
| Agitation. | Give breaths with resuscitation bag. | ||
| Retraction. | Give oxygen. | ||
| Inability to move air through trach. | Initiate emergency plan and begin CPR if necessary. | ||
| Aspiration of foreign material (food, sand, etc.) into tracheostomy. | DO NOT GIVE BREATH WITH RESUSCITATION BAG. This may force aspirate into lungs. SUCTION FIRST.
Respiratory distress or arrest can occur with any aspiration. Be prepared to initiate emergency plan. Begin CPR after suctioning, if needed. Bronchospasm (wheezing) may also occur. The student may require suctioning or medication. |
||
| Accidental extubation. | Reposition trach tube, if possible. If unable to reposition tube, insert new (spare) trach tube. Be prepared to initiate emergency procedure. | ||
Other Potential Problems
| Observations | Reason/Action | |
| Increased secretions, or thicker than usual mucus. | May require more frequent suctioning. These changes or yellow or green mucus may indicate infection. This should be documented in the daily log and the parent informed. Thicker mucus may also be a sign of insufficient humidity. | |
| Fever. | May be a sign of respiratory infection. NOTIFY PARENTS. | |
| Redness or crusting at the stoma. | May be due to a tracheal infection. The site should be thoroughly cleaned and the problem documented in the daily log and reported to the parent. | |
Procedure for Tracheostomy Suctioning
This procedure is to be performed by the School Nurse or other school personnel who have been designated and trained by the nurse to perform this procedure with indirect supervision of the nurse.
| *All equipment for suctioning must be assembled and ready for immediate use at all times and checked daily by the trained caregiver. If the equipment is not present, or is nonfunctional, the student should not attend school.* | |||
| PROCEDURE PRINCIPLES:
1. Wash hands. 2. Assemble the equipment and materials on a small, clean work surface.
|
All students must have a means of suctioning (i.e., a portable suction machine or DeLee catheter) with them during all school activities as well as transport. A manual means of suctioning (such as a DeLee catheter) must be available as a back-up at all times as well for those students who use suction machines | ||
| 3. Explain procedure at student’s level of understanding. | By encouraging the student to assist in the procedure, the caregiver is helping the student to achieve maximum self-care skills. | ||
| 4. Position student as recommended/ ordered. | When at school, most students are suctioned while seated upright. | ||
| 5. Encourage student to cough to expel secretions. | May eliminate need for suctioning. | ||
| 6. Open suction catheter or kit. | Peel paper back without touching the inside of the package to maintain sterility. | ||
| 7. Open saline dosette if instillation is ordered. | |||
| 8. Fill container with saline. | This will be used to moisten the catheter and to clear out secretions in the catheter. | ||
| 9. Put gloves on hands.
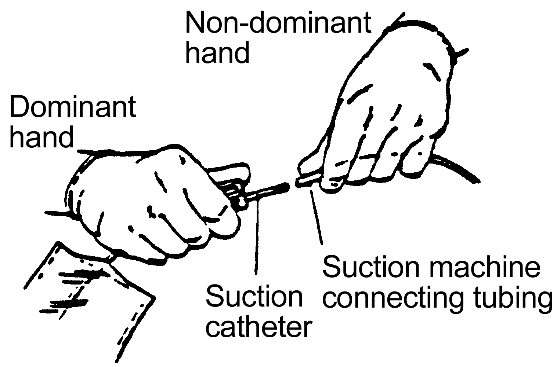
10. Holding the end of the suction catheter in dominant hand, attach it to the suction machine tubing (held in other hand). Leave the other end of catheter in its covering. 11. If machine has vacuum setting: this should be ordered by physician. |
The dominant hand should remain “clean.” It should not touch anything but the catheter. The non-dominant hand should be used to turn on switches, touch other objects, etc.
|
||
| 12. Turn machine on to appropriate vacuum setting for student. | |||
| 13. Encourage student to cough and to take a deep breath if possible. If prescribed, manually ventilate with resuscitator bag. | Coughing helps to bring secretions up toward the trach. By taking a deep breath (or manually ventilating), the student will get more oxygen into his/her lungs. This will also help to loosen secretions. | ||
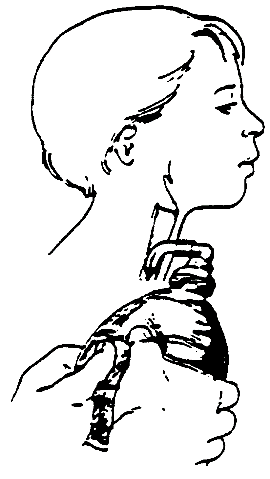
| 14. If prescribed, insert several drops of saline into trach with non-dominant hand. Manually ventilate with resuscitator bag to disperse saline, if ordered.
|
This helps to loosen and thin out thick or dry secretions.
|
||
| 15. Hold suction catheter 2–3 inches from tip with dominant hand and insert tip in saline. | This tests that suction is functioning and lubricates the catheter. | ||
| 16. Grasp catheter connection with other hand; cover vent hole with thumb to suction a small amount of saline through catheter. | 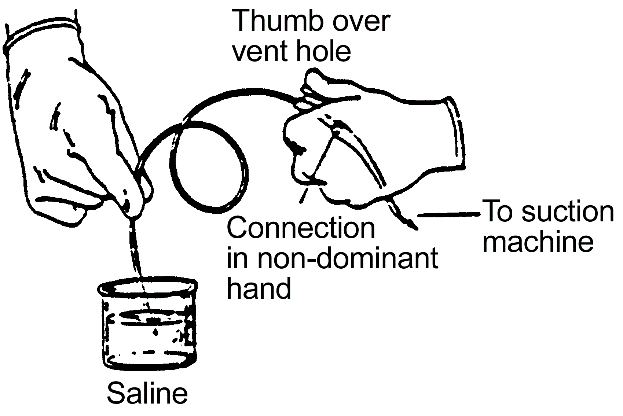 |
||
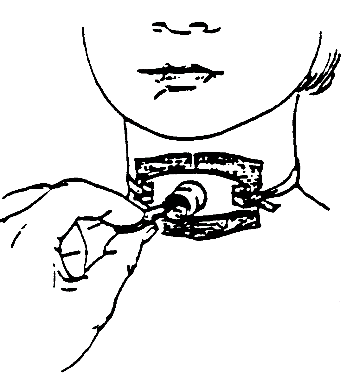
| 17. With thumb off vent hole, gently and quickly insert catheter into trach 1.2 cm beyond the distal end of the trach tube.
|
If the catheter is inserted too deeply, this can cause irritation/injury to the trachea, as well as bronchospasm. Coughing indicates that the suction catheter has passed the tracheostomy tube. | ||
| 18. Cover vent hold with thumb while withdrawing catheter.
|
Rotate catheter gently between thumb and index finger while suctioning and withdrawing. This helps to reach all secretions in the trach tube.
*EACH INSERTION AND WITHDRAWAL OF THE CATHETER MUST BE COMPLETED WITHIN 10 SECONDS. PROLONGED SUCTIONING BLOCKS THE STUDENT’S AIRWAY AND CAN CAUSE A DANGEROUS DROP IN THE OXYGEN LEVEL.* |
||
| 19. Allow student to breathe or give breaths with resuscitator bag between suctioning passes. Suction saline again through catheter to rinse secretions from catheter and tubing. | The student needs to clear lungs of CO2 and get new oxygen/air into lungs. | ||
| 20. If moist, gurgling noises or whistling sounds are heard, or if mucus is seen at the tracheostomy opening, repeat suctioning procedure (steps 15–17). | If appropriate, ask the student if he/she needs repeat suctioning. | ||
| 21. Suction the nose and back of mouth if indicated. | |||
| 22. For each suctioning session a new catheter should be used. | If the nose and mouth are suctioned, the catheter cannot be reused to suction the trach. | ||
| 23. Remove gloves and wash hands. Discard used suction catheter in appropriate receptacle. | |||
| 24. Note color, consistency (thin, thick, etc.) and quantity of secretions. | Report any changes from student’s usual pattern to parent. | ||
| 25. Document procedure on student’s log sheet. | |||
| 26. Be sure suction equipment and supplies are re-stocked and checked daily, and are ready for immediate use. | |||
Possible Problems During Suctioning
*IF ANY PROBLEMS OCCUR, DO NOT LEAVE STUDENT ALONE.*
| Observations | Reason/Action |
| The student develops difficulty breathing during suctioning, or is not relieved by suctioning. | Reassure student.
If trach tube is blocked (suction catheter will not pass), change inner cannula, if present, or replace entire trach tube. Give breaths with resuscitation bag. Give oxygen. Initiate emergency plan and begin CPR if necessary. |
| The trach tube or inner cannula becomes dislodged. | Reposition using gentle pressure. If unable to reposition tube, insert new tube. Be prepared to initiate emergency plan. |
| Bleeding occurs during suctioning: | Stop suctioning. |
| If secretions become blood-tinged and the student is not in respiratory distress. | Check vacuum pressure setting. Adjust to lower setting, if appropriate. |
| If a large amount of blood is suctioned from the tracheostomy or the student develops respiratory distress while being suctioned. | Continue suctioning as necessary to clear the airway. Use the manual resuscitation bag and oxygen if needed.
Initiate the emergency plan and begin CPR, if necessary. Reassure student. |
| Bronchospasm occurs during suctioning. | May be due to excessive suctioning. Allow student to calm. If unable to remove catheter, disconnect from suction tubing and hold oxygen near end of suction catheter. When bronchospasm relaxes, remove catheter. |
Procedure for Cleaning Inner Cannula if Indicated
Occasionally the inner cannula of the tracheal tube may need to be removed and cleaned prior to suctioning. Normally the inner cannula will be cleaned at home. Cleaning at school will only be done by the School Nurse.
- Unlock and remove inner cannula, holding outer cannula in place.
- Clean as directed by physician. If no orders, place cannula in paper cup filled with enough hydrogen peroxide to completely cover cannula. Clean opening with brush or pipe cleaner. Rinse in another cup filled with saline or water. Shake out moisture and re-insert.
- Reinsert and lock cannula into tracheal tube, or replace with a new inner cannula and send used cannula home with student.
Procedure for Changing a Traceal Tube
Normally it should not be necessary to change a tracheal tube at school. However, should the tube become plugged or blocked and cannot be cleared with suctioning, it must be changed AT ONCE or the student will suffer anoxia and respiratory arrest.
EQUIPMENT (parent responsibility):
- Trach tube with ties.
- Sterile gloves (provided for staff by local school district).
- Small scissors.
This procedure is to be performed by the School Nurse or other school personnel who have been designated and trained by the nurse to perform this procedure with indirect supervision of the nurse.
- Assemble equipment and explain procedure to student.
- Wash hands (unless extreme emergency) and put glove on dominant hand.
- Cut old trach ties, being careful of student’s neck, and gently pull trach tube out.
- Using gloved hand, take a new trach tube and insert gently into opening. Secure tube with ties. Tie tightly enough to maintain position without cutting into student’s neck. Tie knot toward SIDE of neck. Cut off loose ends of ties.
- Clean work area and wash hands.
- Record procedure on student’s log, date and sign.
If the student does not breathe normally when new tube is in place, administer rescue breathing and have someone activate EMS. If unable to get the new tube in place, hold the ostomy open with your fingers until help arrives. Try to remain calm and reassure the student.
Procedure to Change a Tracheostomy Tube in an Emergency
| 1. Wash hands. Put on disposable gloves, if indicated. | Should be done in a clean area with good lighting.
In an emergency, trach tube change is done by one person. |
|||
2. Assemble equipment:
|
*ALWAYS HAVE A CLEAN TRACHEOSTOMY TUBE AVAILABLE AND READY FOR USE.*
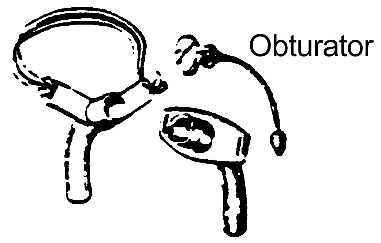
The obturator is used as a guide for insertion.
Never use vaseline or oil-based lubricants to position tubes in student’s neck. |
|||
| 3. Reassure student. | Remain calm. | |||
| 4. Open trach package. | Keep tube clean. DO NOT touch curved part of tube. | |||
| 5. Put obturator into clean tracheostomy tube, or connect swivel to tube. | ||||
| 6. Position the student as ordered. | For small children and infants, have them lie on their back with a blanket roll under the shoulders. | |||
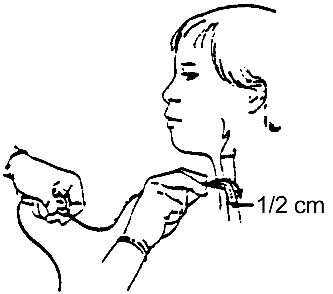
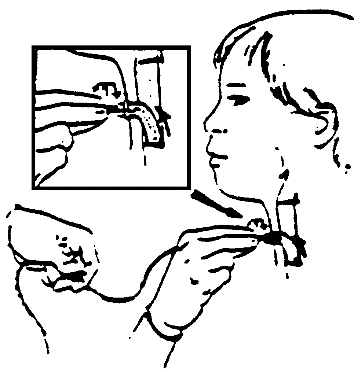
| 7. If the tube does not have an obturator, insert the clean (new) tube at a right angle to the stoma, rotating it downward as it is inserted. If an obturator is present, insert tube straight into stoma. | 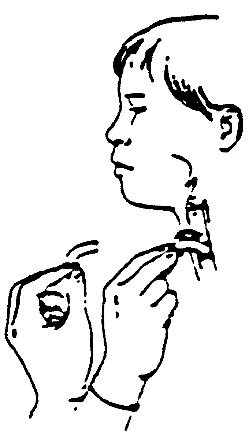 |
|||
| 8. If an obturator is used, immediately remove it after the tube is inserted. Insert inner cannula at this time. | Hold the trach tube in place at all times. A person is unable to breathe when the obturator is in place in the trach tube. | |||
| 9. Listen and feel for air movement through trach tube. | Observe the student for signs of distress, such as blueness, agitation, shortness of breath. | |||
| 10. Secure tube in place with ties or holder. | The trach ties should be tied in a double knot. The ties should be loose enough to slip one finger between the ties and the neck. | |||
| 11. Give 2–4 breaths with resuscitation bag and suction if indicated. | ||||
| 12. Do skin care, if needed (see student-specific guidelines), and reapply gauze around and under the trach and ties. | A small amount of bleeding may occur around stoma or be in secretions after a trach change. If unusual or persistent bleeding is present, notify parent and seek medical attention. | |||
| 13. Discard used equipment according to universal precautionary guidelines. | ||||
| 14. Remove gloves and wash hands. | ||||
| 15. Notify parent or guardian. | ||||
| 16. Document procedure and problems in log. | ||||
Potential Problems
The trach tube comes out: NEVER LEAVE STUDENT ALONE. CALL FOR ASSISTANCE.
| Observations | Reason/Action |
| If the student is not showing signs of distress | Follow procedure for trach tube change outlined above. |
| If the student shows signs of respiratory distress. | Attempt to insert trach tube as outlined above. |
| If tube can be inserted and the student is still having difficulty |
If distress persists, initiate emergency plan and begin CPR. |
Problems Requiring Immediate Attention
| Observations | Reason/Action |
| The tracheostomy tube cannot be reinserted. | This may be due to a false passage, or bronchospasm:
NEVER LEAVE STUDENT ALONE. CALL FOR ASSISTANCE.
|
| It is still impossible to insert the trach tube. |
|
| *IF INSERTION OF TRACH TUBE IS NOT POSSIBLE, AND THE STUDENT HAS RESPIRATORY DISTRESS AND RESPIRATORY ARREST.* | BEGIN CPR WITH MOUTH-TO-MOUTH BREATHS. COVER TRACH STOMA WITH YOUR THUMB IF AN AIR LEAK IS PRESENT. INITIATE THE EMERGENCY PLAN. |
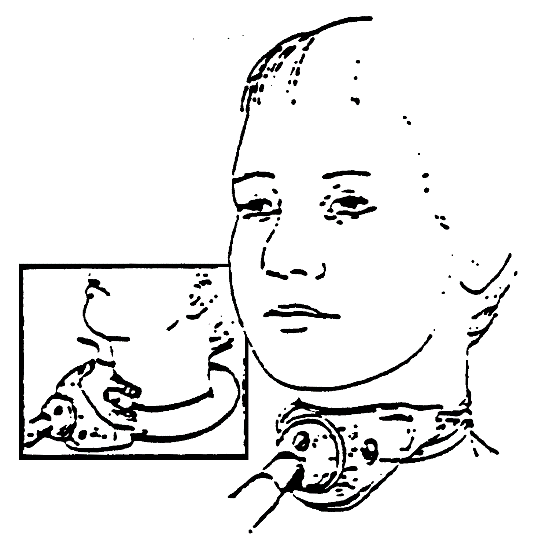
Procedure for Tracheostomy Collar
The collar is one means of delivering oxygen or humidified air to the tracheostomy. The tracheostomy collar may be used with a humidifying device and tubing to prevent dry and/or thick secretions from plugging the trach, and to administer oxygen to the student.
| 1. Wash hands.
2. Assemble Equipment
|
 |
||
| 3. Unwrap humidifier device; place cover on as described. | There are several types of humidification devices.
Check student-specific guidelines. |
||
| 4. Dial percent of oxygen as ordered. | Some students may only require compressed air. | ||
| 5. Connect to compressed air/oxygen source. | |||
| 6. Connect to heater if required. | Some students may use cool mist. | ||
| 7. Take wide bore tubing and place one end on the collar and the other on the humidifier or heater. | |||
| 8. With compressed air/oxygen source on, look at the end of tubing. You should see a fine mist when held up to the light. | If this is not present, check that all connections are on securely and compressed air/oxygen is flowing. Turn on higher flow, then return to flow ordered to see if mist is present. | ||
| 9. Place collar on student’s neck over tracheostomy tube in the midline. | |||
| 10. Wash hands. | |||
| 11. Document procedure and problems in log. | Notify parent of any problems. | ||
Tube Feeding (Gastrostomy)
Tube feedings are to provide adequate fluids, nutrition, or medication through the abdominal wall for a student who is unable to accomplish this orally.
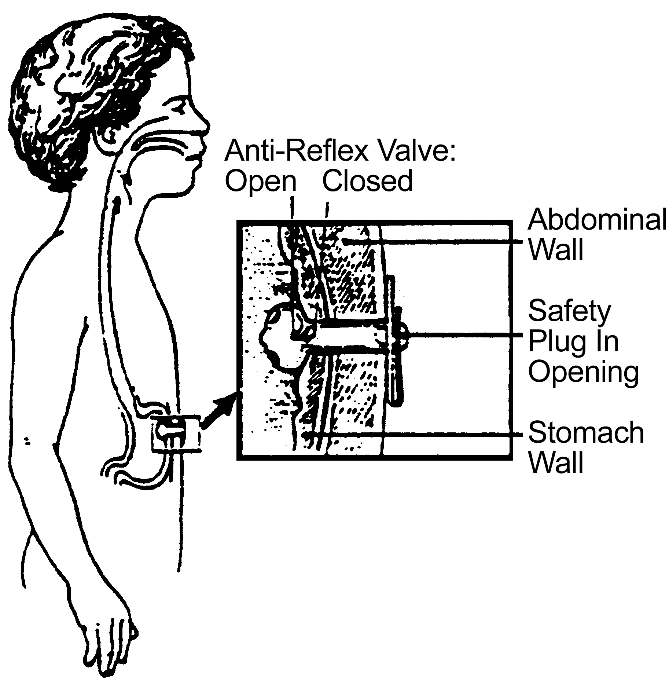
Physically or health impaired students who are unable to orally consume adequate fluids or solids to satisfy nutritional needs, students who may have anomalies of the intestinal tract, students prone to reflux of gastric contents, or aspiration of food and fluids into the lungs, and/or students with severe oral feeding difficulties. The equipment needed:
- Physician’s order and parent authorization (required annually).
- Syringe with catheter tip.
- Container of prescribed supplement, formula medication, or liquid at room temperature.
- Container of water.
- Clamp for tube.
- Continuous feeding pump (if indicated).
The maintenance of an adequately functioning and properly placed gastrostomy tube is the responsibility of the parent/guardian and physician. Replacement or reinsertion of a gastrostomy tube will be the responsibility of the parent.
This procedure is to be performed by the School Nurse or other school personnel who have been designated and trained by the nurse to perform this procedure with indirect supervision of the nurse. If medication is ordered, it will be administered by the nurse.
- Assemble equipment, explain procedure to student and wash hands.
- Position student with head elevated to a minimum of 30 degrees.
- Positioning may vary; consult physician. Supine position creates a greater danger of reflux and aspiration.
- Perform feeding as specified. Methods of tube feeding may vary, e.g., bolus, gravity flow, or continuous feed. Consult physician for details
- Allow student to remain elevated for time prescribed by physician and observe for signs of reflux or aspiration.
- Clean equipment and work surface. Wash hands.
- Record procedure on student’s log, including date and time of feeding, type and amount of fluid given, amount of water given, any adverse reactions and name of person performing the procedure
Feeding Difficulties and Precautions
- If student starts to gag, discontinue feeding and let tube hang down unclamped. Gagging may be caused by allowing the fluid to flow in too rapidly or causing distension of the stomach by allowing air to enter.
- If the student vomits, clamp the tube and discontinue feeding.
- If formula will not go in, consult parent or physician.
- If this procedure is being performed by designated school personnel, the School Nurse must be notified of any adverse reactions or complications. The School Nurse should perform this procedure if the student routinely exhibits complications during feeding.
Possible Problems Requiring Immediate Attention
| Observations | Reason/Action |
| Color changes/breathing difficulty. | This may be due to aspiration of feeding into lungs.
Stop feeding immediately. Call nurse if not present. Assess situation. If problem continues, institute emergency plan and notify parents. |
Possible Problems that are Not Emergencies
| Nausea and/or cramping. | Check rate of feeding; may need to decrease rate.
Check temperature of food or fluid; may be too cold – stop feeding; let matter get to room temperature, then administer. If problem continues, notify School Nurse, parent, or doctor. |
| Vomiting. | If you have checked all of the above, stop feeding, call School Nurse, parent, or doctor. |
| Blocked gastrostomy button. | May be due to inadequate flushing or very thick food or fluid. Flush with warm water after feeding or medication. If blockage remains, contact parents. |
| Bleeding/drainage/redness/irritation. | Check skin around gastrostomy button site daily. Clean stoma site if leakage of food/fluid/medication comes in contact with skin.
Refer to student-specific guidelines for cleaning instructions. Turn button in a complete circle with each cleaning. Dry stoma site well; open to air to facilitate drying. |
| Leaking of stomach contents. | May be due to a problem with the anti-reflux valve (sticking or broken). |
| Gastrostomy button falls out. | This is not an emergency. Save the button for re-insertion. For some students whose tract may close quickly, the G-tube button may need to be inserted within 1-2 hours. Cover gastrostomy site with adhesive bandage or clean dressing. Contact School Nurse, parents, or physician. |
Tube Feeding (Nasogastric)
Tube feeding is to provide adequate fluids, nutrition, or medication via a nasogastric tube.
Students who are unable to orally consume adequate fluids or solids to satisfy nutritional needs. Necessary equipment are:
- Physician’s order and parent authorization (required annually).
- Syringe with catheter tip.
- Container of prescribed supplement, formula, medication, or liquid at room temperature.
- Container of water.
- Clamp or plug for tube.
- Continuous feeding pump (if indicated).
The maintenance of an adequately functioning and properly placed nasogastric tube is the responsibility of the parent/guardian.
This procedure is to be performed by the School Nurse or other school personnel who have been designated and trained by the nurse to perform this procedure with indirect supervision of the nurse. If medication is ordered, it will be administered by the nurse:
- Assemble equipment, explain procedure to student and wash hands.
- Position student as specified with head elevated to a minimum of 30 degrees. Positioning may vary; consult physician.
- Check the placement of the tube. Some readjustment of the nasogastric tube may be performed prior to feeding.
- Perform feeding as specified. Methods of tube feeding may vary, e.g., gravity, syringe, pump. Consult physician for details.
- Clamp the tube.
- Allow student to remain elevated for time prescribed by physician and observe for signs of discomfort.
- Clean work area and wash hands.
- Record procedure on student’s log, date and sign.
Possible Problems Requiring Immediate Attention
| Observations | Reason/Action |
| Gagging, choking. | This may be due to improper nasogastric-tube placement. Follow steps for checking NG-tube placement. If NG-tube is not in proper position, remove tube or follow student-specific guidelines for repositioning. |
| Color changes/breathing difficulty when not receiving feeding. | Color changes or breathing difficulty are not always related to NG-tube feeding. In addition to checking NG-tube placement, it is important to carefully assess the student for other problems. |
| Color changes/breathing difficulty while receiving feeding. | STOP FEEDING IMMEDIATELY. This may be due to improper NG-tube placement. Follow steps for checking NG-tube placement.
Carefully assess the student for other problems. This may be due to aspiration of feeding into lungs. |
| Respiratory distress continues. | Call for help and initiate emergency plan. |
| Nausea and/or cramping. | Check rate of feeding; may need to decrease rate. Check temperature; may be too cold – stop feeding and let food/fluid get to room temperature, then administer. If problem continues, notify School Nurse, parent, and doctor. |
| Vomiting. | Stop feeding and refer to student-specific guidelines.
Vomiting may not be due to NG feeding. It is important to carefully assess the student for other problems. |
| NG-tube falls out. | Notify School Nurse/parents/physician. |
Urinary Catheterization
Urinary catheterization is the insertion of a sterile catheter into the bladder using sterile techniques. Clean catheterization is the insertion of a clean catheter into the bladder using clean techniques. Intermittent catheterization is the insertion of a clean or sterile catheter into the bladder at periodic intervals. Self-catheterization is the insertion of a catheter into the bladder by the student. Clean, intermittent self-catheterization is the ultimate goal of all students who require catheterization during the school day.
Students should be instructed in this procedure as soon as they are ready. The School Nurse, in cooperation with the family and physician, will assist with providing this instruction. Many adaptations may be needed to accommodate each individual student. Students should be encouraged to participate in any steps of the process as they wish, no matter how minimal.
To empty the bladder of urine at appropriate intervals or instill prescribed medication, to prevent bladder distention and constant urine leakage, to reduce chances of a bladder infection, to remove residual urine, and to reduce chances of urinary reflux into the kidneys and secondary kidney damage. Equipment needed:
- Physician’s order and parent authorization (required annually).
- Clean or sterile catheter of appropriate size.
- Lubricant (especially for males).
- Drainage or collection receptacle.
- Wet wipes or equivalent.
- Sterile gloves (only if ordered), clean gloves.
- Antiseptic solution (only if ordered by physician).
This procedure is to be performed by the student, the School Nurse or other school personnel who have been designated and trained by the nurse to perform this procedure with indirect supervision of the nurse.
Procedure for Clean Intermittent Catheterization – Male:
| Procedure | Points to Remember | |||||||
| 1. Wash hands with soap and water. Put on gloves. | If student does procedure unassisted, gloves are not needed. | |||||||
| 2. Explain the procedure to the student at his level of understanding. Have him do as much of the procedure as he is capable of, with supervision as needed. | By encouraging the student to assist in the procedure, the caregiver is helping him to achieve maximum self-care skills. | |||||||
| 3. Assemble equipment:
|
||||||||
| 4. Position the student. | He may be catheterized lying, standing or sitting. If able, a boy may stand at the toilet. If unable to sit or stand, he may lie on his back. This procedure requires a receptacle to catch the flow of urine from the catheter. | |||||||
| 5. Depending on his age, show the student the location of the urethral opening. | ||||||||
6. Cleanse the penis in the following manner:
|
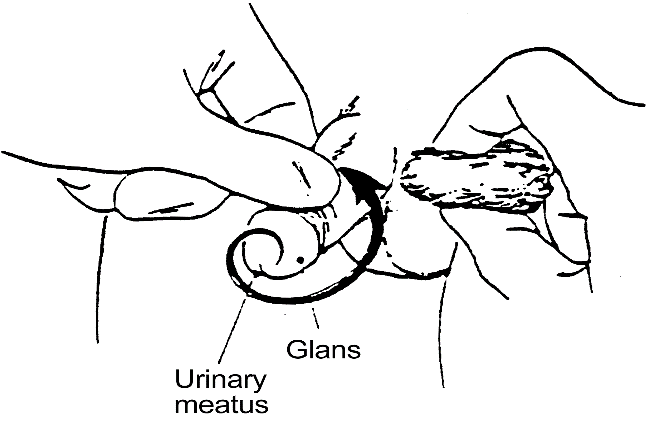
Always start at the meatus and wash toward the base of the penis. This helps remove bacteria from the area. |
|||||||
| 7. Lubricate the tip of the catheter with water soluble lubricant. | ||||||||
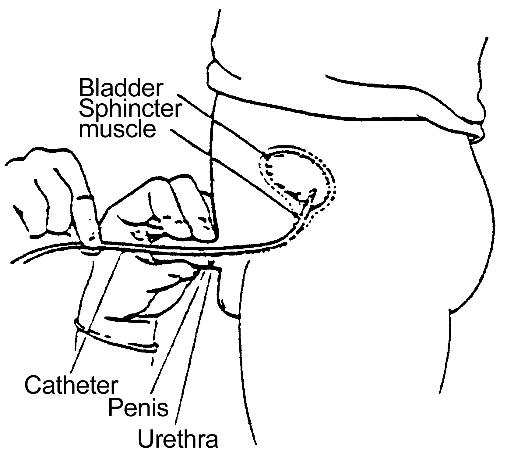
| 8. Locate the urethral opening. Hold the tip of penis erect and insert catheter gently into the urethral opening. Some resistance may be met at the bladder sphincter. Use gentle but firm pressure until the muscle relaxes. | ***DO NOT FORCE CATHETER. IF YOU FEEL UNUSUAL RESISTANCE, NOTIFY THE PARENT.***
Make sure the other end of the catheter is either in a receptacle to catch urine or over the toilet. |
|||||||
| 9. Insert the catheter until there is a good flow of urine. When the flow stops, insert catheter slightly more and then withdraw a little to make sure all urine is drained. Rotate the catheter so that catheter openings have reached all areas of the bladder.
It is also helpful to have the student bear down a couple of times while the catheter is in place. If you have been trained to do so, apply external manual pressure to encourage the urine flow until the flow stops. This must be done with the catheter in place. |
 |
|||||||
| 10. When bladder is emptied, pinch catheter and withdraw. | This prevents urine still in the catheter from flowing back into the bladder. | |||||||
| 11. If the student is not circumcised, pull the foreskin over the glans when finished. | ||||||||
| 12. Wash, rinse and dry the catheter if it will be used again. Store in an appropriate container. | ||||||||
| 13. Measure and record the urine volume if ordered. Dispose of urine and wash receptacle. | ||||||||
| 14. Remove gloves and wash hands with soap and water. | ||||||||
| 15. Note in your log that the procedure was done. | Report to the parent any change, such as cloudy urine, mucus, blood, foul odor, color changes, or unusual wetting between catheterizations. These are signs of infection. | |||||||
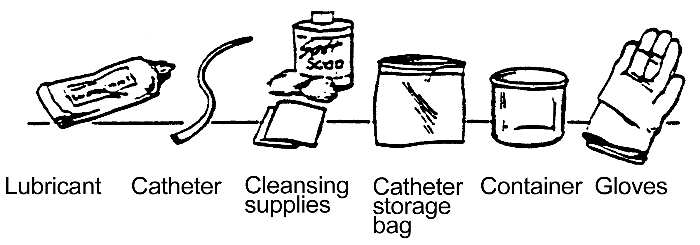
Procedure for Clean Intermittent Catheterization – Female:
| Procedure | Points to Remember | ||||||
| 1. Wash hands with soap and water. Put on gloves. | If student does procedure unassisted, gloves are not needed. | ||||||
| 2. Explain the procedure to the student at her level of understanding. Have her do as much of the procedure as she is capable of, with supervision as needed. | By encouraging the student to assist in the procedure, the caregiver is helping her to achieve maximum self-care skills. | ||||||
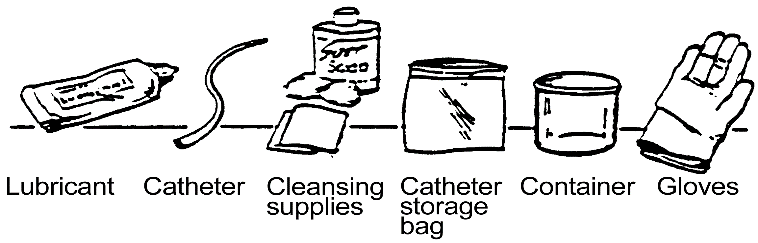
| 3. Assemble equipment:
|
|||||||
| 4. Position the student. | She may be catheterized lying or sitting. If able, girls may sit on the toilet with legs straddled. A student unable to sit may lie on her back. This procedure requires a receptacle to catch the flow of urine from the catheter. | ||||||
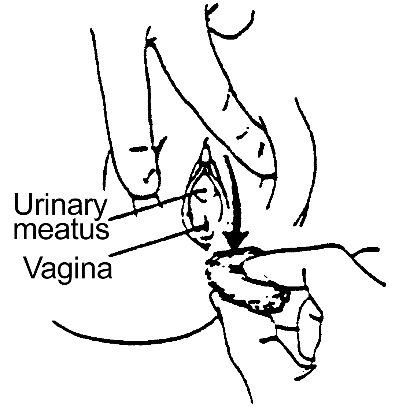
| 5. Depending on her age, use mirror to show the student the location of the urethral opening.
6. Separate the labia (lips) and hold open with fingers. Cleanse in a direction from the top of the labia toward the rectum. Wash three times; once down each side and once down the middle. Use a clean cotton ball each time. |
 |
||||||
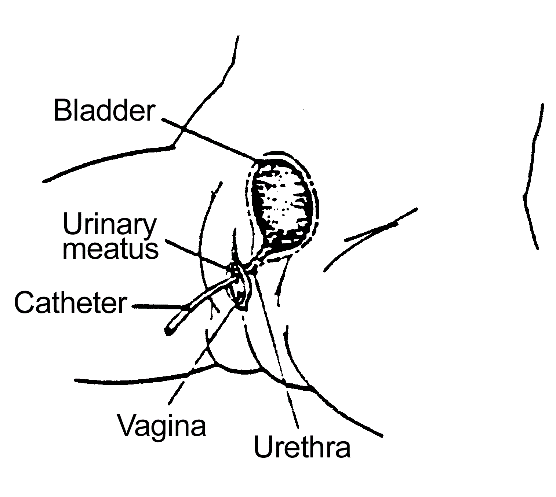
| 7. Locate the urinary meatus (opening). Gently insert the catheter until you obtain urine. | The female urethra is short and straight. Keep the other end of the catheter over the toilet or the receptacle. | ||||||
| 8. When urine flow stops, insert catheter slightly more. If no more urine is obtained, withdraw it slightly, rotating catheter so that catheter openings have reached all areas of the bladder.
It is also helpful to have the student bear down a couple of times to insure that all urine has been completely drained. If you have been trained to do so, apply manual external pressure until the urine stops flowing. This must be done with catheter in place. |
 |
||||||
| 9. When bladder is completely empty, pinch catheter and withdraw. (If using metal catheter, put finger over end.) | This prevents urine still in catheter from flowing back into the bladder during withdrawal. | ||||||
| 10. Wash and dry catheter if it is to be reused. Store in appropriate container. | |||||||
| 11. Measure and record urine volume if ordered. Dispose of urine and wash receptacle. | |||||||
| 12. Remove gloves and wash hands with soap and water. | |||||||
| 13. Note in your log that the procedure was done. | Report to the parent any change such as cloudy urine, mucus, blood, foul odor, color changes, or unusual wetting between catheterizations. These are signs of infection. | ||||||
Possible Problems
| Observations | Reason/Action |
| Bleeding from urethra. |
This may be due to trauma of the urethra or urinary tract infection. Discontinue catheterization. Contact parent and doctor.
|
| Inability to pass catheter. | This may be due to increased sphincter tone caused by anxiety or spasm.
In girls – check catheter placement. The catheter may be in the vagina. If catheter is in the vagina, do not use; use a clean catheter. In boys – reposition penis and use gentle but firm pressure until the sphincter relaxes. If unsuccessful, notify parent/doctor for further instructions. |
| No urine on catheterization. | This may be due to improper placement of catheter. Check position of catheter. |
| Cloudy urine, mucus, blood, foul odor, color changes or unusual wetting between catheterizations. | This may be due to a urinary tract infection. Always report to parent any changes in the student’s usual pattern. |
Ventilators/Mechanical Respiratory Support
DEFINITION: A mechanism for stimulating breathing and total exchange of gasses, including the administration of oxygen, in the lungs by the use of mechanical pressure to accomplish the inspiration and expiration which is usually provided by the diaphragm and thoracic cage. The ventilator is attached through a tracheostomy tube.
Some students who would otherwise require long term dependence on a ventilator may receive assistance breathing with a Phrenic Nerve Pacemaker, which is an electrode surgically implanted next to one or both phrenic nerves and attached to a transmitter which is worn outside the body. This stimulates the diaphragm in a manner similar to the ventilator. The student may also be on oxygen. This technique allows greater mobility of the student.
INDICATIONS: Students who need help breathing because of central nervous system dysfunction, neuromuscular disease, musculoskeletal diseases or injury, cardiac conditions, chronic obstructive pulmonary disease, or other chronic respiratory distress syndrome.
Ventilator Features
Standard ventilator features that should be checked at least daily and on arrival at school.
| Power source. | ***MUST BE CONNECTED FOR MACHINE TO FUNCTION*** | ||||
| Internal battery. | The internal battery is generally a 12V DC battery intended for emergency use only. | ||||
| External battery. | The external battery is connected to the ventilator via a cable. If fully charged, it will operate for approximately 10–20 hours. | ||||
| Accessible, functioning electrical outlets. | |||||
| Emergency power supply. | |||||
| Back-up battery. | The back-up battery is usually kept at home. | ||||
Oxygen source:
|
An oxygen source may be included, if prescribed for the student.
Oxygen may be supplied in gas or liquid form. Assure adequate supply of oxygen is available for the day. |
||||
Humidifier:
|
Moisturizes the air breathed by the student.
Any student who has his/her nose and mouth bypassed by a trach tube needs a humidifier. Always remember to have an adequate amount of water in the humidifier and have it set at a safe temperature. |
||||
| Ventilator circuit:
Tubing and spare tubing required:
Valves:
|
The ventilator circuit consists of the tubing that is attached to the ventilator and the student’s tracheostomy tube, and such other components as the humidifier, and the exhalation and PEEP valves. The tubing brings the air from the ventilator to the student. Caution should always be taken not to block or obstruct the exhalation valve with the student’s clothing. Ventilator circuit maintenance: clean equipment daily or as needed. This should be done at home. | ||||
Alarms:
|
ALARMS SHOULD NEVER BE TURNED OFF.
If a heated humidifier is used, always check the water level. |
||||
Other equipment that should be checked daily:
|
|||||
Ventilator Parameters
| These are prescribed settings for a given child, and should be checked several times during the day—every 1–2 hours or more frequently if the student’s status changes. | A safety card, stating the student’s ventilator settings, should be mounted on the ventilator and easily visible. |
| Tidal volume. | The amount of air in each breath. Determined by the student’s size. |
| Respiratory rate. | Number of breaths delivered in a minute. Determined by the student’s condition and size. |
| Oxygen %. | Based on the individual student’s needs. Room air is 21%. |
| Peak Inspiratory Pressure (PIP). | The amount of pressure required to inflate the lungs to the prescribed tidal volume. |
| Positive End Expiratory Pressure (PEEP). | The amount of pressure needed to keep the lungs from totally collapsing after exhalation. |
| Ventilator Mode. | The type of respiratory support administered to the student: Intermittent Mandatory Ventilation (IMV), Assist-Control, or Spontaneous Intermittent Mandatory Ventilation (SIMV). The prescribed mode will be determined by the student’s condition and respiratory ability. |
| Inspiratory Time (“I” time). | The amount of time in the vent cycle used to deliver a breath. |
| High Pressure Alarm. | Reflects a too-high inspiratory pressure. May indicate increased resistance or obstruction. |
| Low Pressure Alarm. | Indicates a too-low inspiratory pressure.
Warns of a leak in the system; may signal that adequate volume is not being delivered. |
| Power Source Alarm. | Indicates a change in power. |
| Heat Alarm. | ALARMS SHOULD NEVER BE TURNED OFF. Temperature of humidifier needs to be checked. Check water level. |
Procedure Principles
- See procedures regarding tracheostomy care, suctioning, oxygen administration, and CPR in this manual.
- All ventilators have manuals that should be read prior to assuming care of the student.
- The ventilator must be continually monitored to assure that it is working properly. All machines have alarms that are triggered if a malfunction occurs. If an alarm goes off always check the student first! If the student is okay, then check the ventilator.
- The SDE-licensed School Nurse should monitor respiratory status and suction the student as indicated or ordered by the primary care provider.
- Nutritional status needs to be monitored to ensure student is receiving adequate nutrients and fluid.
- Respiratory tract infection can be decreased by using good hand washing technique and classroom sanitation. Aseptic technique and gloves should be used for suctioning.
- Students who require ventilator assistance, and who are attending a school-based program, must provide a written physician’s statement and recommendations for management in the school setting. Health management must include access to a SDE-licensed School Nurse who is present on campus during the school day. The student may also require a student-specific educational assistant to monitor them at all times during the school day and facilitate placement in the least restrictive environment.
- The SDE-licensed School Nurse will maintain close communication with the student’s primary care provider and provide emotional support to the student, family, classmates, and staff as needed.
Possible Problems
| Observations | Reason/Action | |
Child appears to be in distress:
|
Immediately check and reassure the student. Call for assistance. NEVER LEAVE THE STUDENT ALONE. These symptoms may be due to:
It may also be due to a ventilator malfunction:
Check to see that power source is functioning and that oxygen supply is adequate. Disconnect the child from the ventilator and use manual resuscitator bag if needed while attending the student’s needs. |
|
| Trach tube is dislodged. | Replace the tube. | |
| Trach tube is plugged. | Attempt to suction: instill saline if indicated. If unsuccessful, replace tube. | |
| Student has increased secretions. | Suction the trach. | |
| Student is wheezing. | Administer bronchodilators by nebulizer as ordered and suction as necessary. | |
| Child continues to be in distress or becomes unconscious. | Continue using manual resuscitator and activate emergency procedure. | |
| Distress is relieved by disconnecting from ventilator and using manual resuscitation. | Check the ventilator while using the manual resuscitator to assist the student’s breathing.
Check circuit, valves and tubing for leaks or obstruction. If unable to locate and correct problem with ventilator, continue using resuscitation bag, call the home care company, parent and other providers as specified in student-specific guidelines. Activate emergency plan. |
|
| Power supply is not functioning. | “Bag” with manual resuscitator until backup power supply is in operation. | |
| An alarm is sounding. | ALWAYS CHECK STUDENT FIRST; IF THE STUDENT IS OKAY, CHECK THE VENTILATOR. | |
|
The student may be disconnected from the vent.
The exhalation valve is not working (wet or punctured). The trach tube is no longer in place. The circuit tubing is no longer attached or is loose. Water is present in pressure or exhalation tubing. Humidifier is improperly attached or leaking. |
|
|
This may indicate increased resistance or obstruction.
The child may need to be suctioned for secretions or a mucus plug. The circuit tubing may be blocked by water or pinched off. The exhalation valve may be obstructed. The trach tube may be out of alignment. The student may be coughing, or doing something else to raise pressure transiently. |
|
|
Check to see that power source is functioning.
The alarm may sound if power source is interrupted, e.g., power failure, battery change, etc. |
|
|
Temperature of humidifier needs to be checked.
Check water level. |
|
NOTE: Most home ventilators run on electric current with battery back-up. If the power is interrupted and all DC backup systems fail, activate EMS and ventilate the student with an AMBU bag until help arrives. The power source for a phrenic pacemaker is a battery pack. The spare battery pack and an AMBU bag should be carried by the student at all times.
Ventriculo-Peritoneal (V-P) Shunt
A V-P shunt or tube is a with a one-way valve is inserted surgically into the ventricle of the brain to drain excess cerebrospinal fluid from the brain into the peritoneal cavity to prevent the development of ever-increasing head size when hydrocephalus is present. There may be complications that occur frequently and may need shunt revision frequently occurs because of occlusion, infection or malfunction of the shunt. Occasionally revision is necessary because of the growth of the student; however, coiled tubing normally allows for adequate growth. Shunt-dependent students will manifest symptoms of increased intracranial pressure if the shunt does not function properly.
Signs of Shunt Malfunction
- Nausea and vomiting.
- Increased systolic blood pressure.
- Lethargy.
- Headaches.
- Irritability.
- Fever.
- Swelling, redness, or tenderness along the shunt tract.
- Seizures.
Guidelines
- Obtaining a complete health history.
- Obtaining medical reports providing the physicians recommendations for care in the school setting.
- Completing nursing assessment and development of an Individualized Healthcare Plan.
- Observing for signs of shunt malfunction and increased intracranial pressure. If observed, notify the School Nurse and parent/guardian.
- Generally, few restrictions need to be placed on the student’s daily activities. The student’s head should, however, be protected from trauma.
- The School Nurse should monitor the student’s head circumference and blood pressure on a regular basis. Any symptoms or unusual findings should be reported to the parent/guardian and/or physician immediately.
- Students who require hospitalization for surgical revision of their shunt may experience significant interruption of their educational program. Occasionally previously learned skills are lost. These students may require temporary home-based services.
Resources and References
-
- Haynie, M., Porter, S. M., & Palfrey, J. S. (1989). Children Assisted by Medical Technology in Educational Settings: Guidelines for Care. Boston: Project School Care, The Children’s Hospital.
- Larson, G., RN, PNP, MPH, Ed. Managing the School Age Child with a Chronic Health Condition. Published by DCI.
Documents
-
- Ventilator Machine and Circuit Skills Checklist
- Ventilator Troubleshooting Alarms Skills Checklist
- Male Catheterization Skills Checklist
- Female Catheterization Skills Checklist
- Nasogastric Tube Feeding — Bolus Method Skills Checklist
- Nasogastric Tube Feeding — Slow Drip/Continuous Method Skills Checklist
- Ileostomy Care Skills Checklist
- Urostomy Care Skills Checklist
- Suctioning — Nasal and Oral Technique Skills Checklist
- Gastrostomy Feeding Button — Slow Drip/Continuous Method Skills Checklist
- Gastrostomy Button — Bolus Feeding Skills Checklist
- Summary of Skills Training and Recommendations
- Administration of Specialized Health Service Student Log
- Authorization to Administer Specialized Health Service